31 Mar

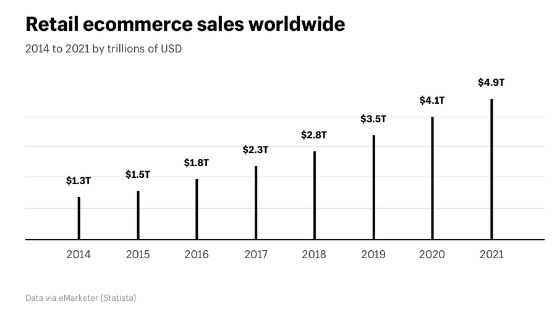
Shopify SEO is essential for global eCommerce growth. It’s actually estimated that retail eCommerce sales will amount to nearly $5 trillion worldwide in 2021. With this in mind, it’s equally important that your international SEO strategy fits your business’ needs.
International SEO for eCommerce using Shopify
We’ve actively researched what’s available and even spoken to a Shopify rep on what the best options are. Combining this information with our international SEO specialist knowledge, We’ve come up with the optimal solution for one particular store.
- UPDATE: Shopify International Domains
- How to set-up a UK e-commerce business
- Working with a ccTLD
- Setting up the currency and language targets in Shopify
- Advantages of International Domains with Shopify
- Step 1: Shopify Multi-Currency
- Multi-currency set-up
- Geo-location drop-down selector
- Step 2: Shopify Translation
- Why use a translation app?
- How to select a translation app
- Which Shopify translation app is best?
- Option 1: Subdirectory/subfolder implementation
- Option 2: Subdomain implementation
- Option 3: Shopify Multiple Stores
- How to use Google Sheets + Google Translate
- Step 3: Submit Your New Language to Google for Indexing
- Create an additional property in Google Search Console
- Change Geo-Targeting Settings for the new subdirectory
- Create XML Sitemap in Screaming Frog
- Upload XML Sitemap to Shopify
- Submit New XML Sitemap into Google Search Console
I’ll take you through exactly what I did and recommend the essential steps that you could take to quickly launch your Shopify store into international territory. Depending on factors such as budget, development resources, translation services, and time, you may choose a different option.
UPDATE: Shopify International Domains for English speaking target countries
A more recent addition to Shopify is international domains which were launched in September 2020. The key advantage of using international domains or subdomains is enabling localised currencies within search results for all your target territories.
The standard for an ‘international domain’ is having yoursite.com as the main website. You’ll then be able to link other dedicated country domains. Unfortunately, a subfolder implementation just isn’t possible at this time so the next best thing is using a subdomain implementation for your English (en) speaker sites.
I didn't see any mention of subfolders, only subdomains which might not be an ideal option for many websites. Hopefully @Shopify can roll out subfolder internationalisation too in the future. Progress none the less https://t.co/XaUHdlMYep
— Kevin Kapezi (@KEVKDigital) September 4, 2020
How to set-up a UK e-commerce business
Now, if you’re a UK business, you’d want to decide if you want to use:
- the main site yoursite.com as the US (global site). Alternatively, if you have a stronger business and brand case, you may want to keep the main site as the UK site. You can then have a US subdomain instead.
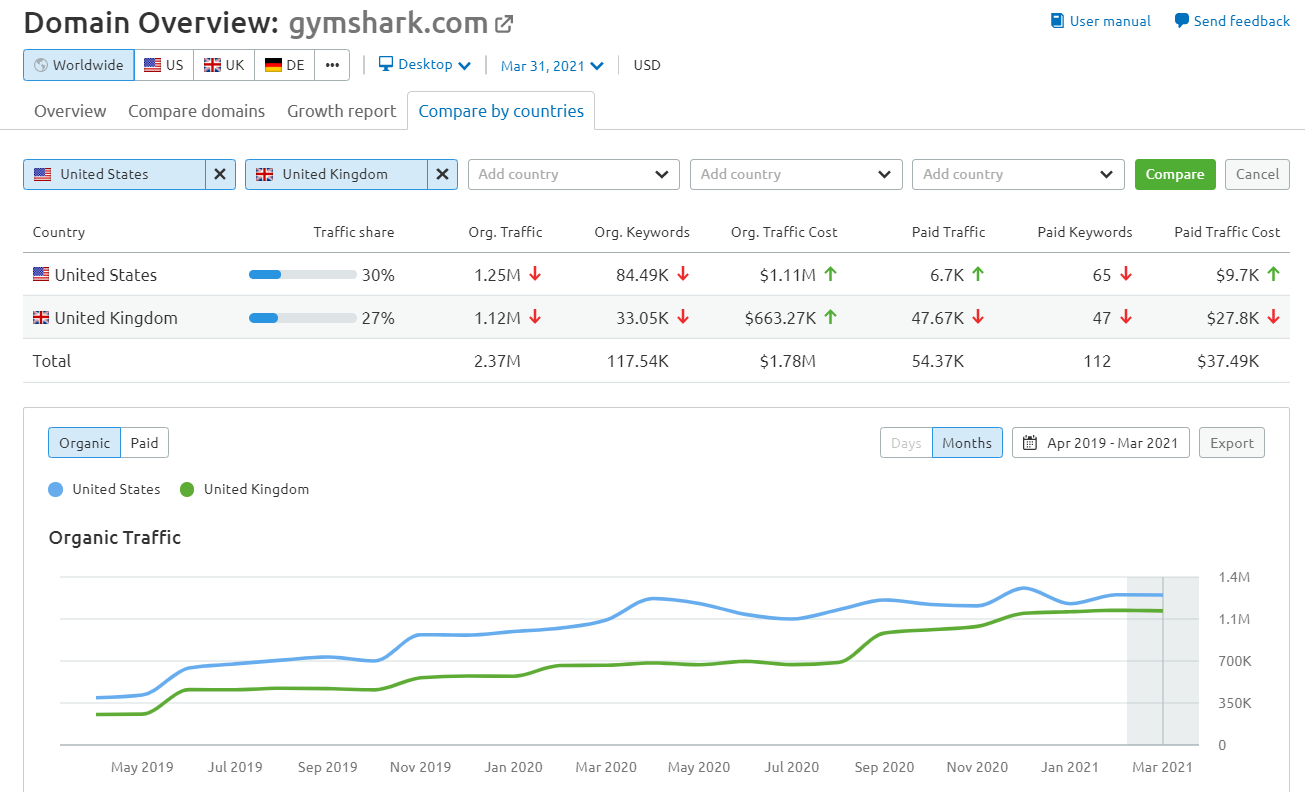
- uk.yoursite.com (subdomain) or yoursite.co.uk (ccTLD) if going for a global US site. As an example, Gymshark has the UK site as a subdomain: https://uk.gymshark.com/ and the main site, https://www.gymshark.com/ targets English speakers in the US.
It’s important to note that targeting American customers is equally, if not, more important for Gymshark than having a local UK site and this has likely dictated their approach.
Working with a ccTLD
You can always redirect yoursite.co.uk to the UK subdomain if you go for the first option.
You may want a ccTLD as the UK site due to branding concerns or if you already have yoursite.co.uk as an active site. There may be other psychological benefits for using a ccTLD and it’s also arguably a stronger local SEO signal, however, a .com domain is now so commonplace for many online UK businesses.
Setting up the currency and language targets in Shopify
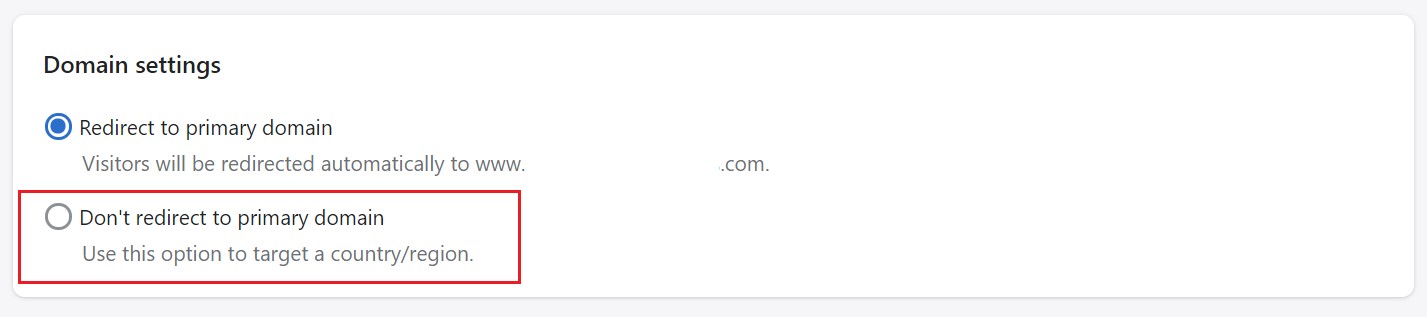
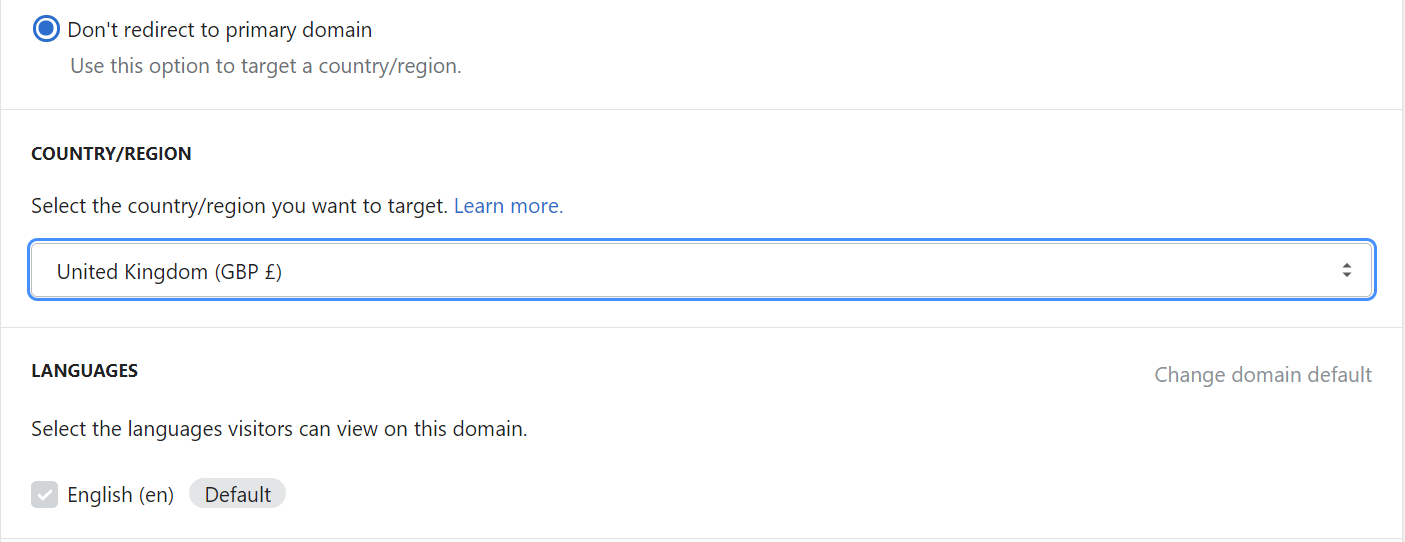
You can then set-up the domain, once connected, by selecting “Don’t redirect to primary domain” within the Shopify domain panel.
Once selected you can target the local currency, GBP and language, English (en) in this case.
You can then set-up the following additional subdomains if you are selling a lot of products in these markets already:
- ca.yoursite.com for Canada
- au.yoursite.com for Australia
- ie.yoursite.com for Ireland
Advantages of International Domains with Shopify
The beauty of this set-up is that you’ll now have slightly more localised URLs for your target countries, showcasing the correct currencies. The hreflang and sitemaps for each site are handled automatically which will tell search engines that these international domains are duplicate versions of your website. Ideal for SEO.
An added bonus is that you will also be able to have paid media campaigns with unique URLs for each target market.
In the future, you may want to translate the site to other European languages e.g. Danish, Norwegian, Swedish, French, German and/or Spanish etc.
This can be done via a translation app. An example for France would be yoursite.com/fr which would then target French-speaking people.
Here’s how you can continue the internationalisation for other languages by following the below steps.
Step 1: Shopify Multi-Currency
Provide users with currency options to help international customers order more easily.
Multi-currency set-up
First, you need to enable Shopify multi-currency within your payment options.
- You can alter these settings within Shopify’s Payment section
- Conversion settings allow you to choose how you want to round up prices in your Shopify store
- The currency selector tool will then allow users in other countries to change prices in local currency
- Shopify does conversion and payments automatically for you according to your settings and makes payments in your default currency
Geo-location drop-down selector
Use an app to provide a dropdown country selector.
- Using an app, currencies such as GBP, USD, EUR, etc are available and come with a drop-down currency selector.
- You can also pick the correct currency by IP address identification.
Step 2: Shopify Translation
Update theme to latest version + add the language to store
- Purchase app + plan implementation
- Create a back-up of the theme
- Create a new language
- Add translations
Shopify instructions
According to Shopify, to sell in multiple languages, you need to have the following:
- A supported third-party language translation app installed in your store.
- A theme that’s compatible with selling in multiple languages. All the free themes from Shopify are compatible. You might need to update your theme for it to be compatible with selling in multiple languages. If you’re using a third-party theme, then you can contact your theme developers to check if it’s compatible.
- A theme that has a language selector. Only the newest versions of the Debut and Brooklyn themes have built-in language selectors. If you’re using another theme or an older version of Debut or Brooklyn, then you can add a language selector using the Geolocation app by Shopify.
However, we recommend using Conversion Bear as the UI and design are more customisable for your store.
From your Shopify admin, go to Settings.
- Click Store languages.
- In Translated languages, click Add Languages.
- Choose a language from the drop-down menu, then click Add. Click Visit Shopify App Store and follow the steps to install a translation app to your store.
- Follow the steps in the app to translate your store’s content and publish new languages.
- Click Preview to view different languages in your online store. You can preview both published and unpublished languages.
Why use a translation app?
- Automatic translations may be available and this could cover checkout info, theme files, etc which might be missed if translating manually
- Easy to use interface with options of adding your translators and allowing them to log-in separately to work directly with the content
- Save time and get your international expansion done quickly using machine learning-assisted translation which can be corrected over time
- Integrations usually come with an automated country selector and drop-down tool which saves costs on additional development work required if creating a translation completely from scratch
- CSV/Excel Import Export option available when working with professional translators
How to select a translation app
Here are a few questions to help you decide.
What’s the primary purpose of the new translation?
Organic traffic from native speakers in their primary country of residence, for example, German speakers in Germany is usually the answer.
Does the translation app do what it says?
When you visit their websites and Shopify app landing pages most of these apps claim to be the best solution for SEO. However, upon further analysis, this could be incorrect. As always, with SEO it depends on your business needs but there are some critical issues to take note of.
Does it use the appropriate website structure for your needs?
When expanding overseas the first question is usually should we place the new versions of the website on a Country Code Top Level Domain (ccTLD), subdomain, or subdirectory. If your first priority is organic traffic and leveraging the power of a single domain, using a subdirectory is almost always advised as the best option. However, you could have reasons for using a subdomain or a new site on ccTLD.
Does it implement hreflang properly?
This is critical and can only really be tested once you have tried the app for yourself. Our preferred tools to test the implementation are Screaming Frog and SEMrush. There are plenty of free tools available but they all have varying degrees of depth. You can’t go wrong with leading paid SEO tools that were built specifically for SEO professionals. SEMrush has a 7-day free trial so use that wisely along with trying out your translation apps.
Does it use self-referencing canonicals on the language-specific URLs?
This is another critical question. If the canonicals are done incorrectly and they reference a different URL than the page then the SEO falls apart.
Does the country/language selector integrate well with my theme?
Our experience with translation app providers is that they are willing to customise the set-up of the country/language selector to suit your theme. Make sure that the app you use has available support to help you with this.

Which Shopify Translation app is the best for International SEO?
It really depends on your implementation method. For a subdirectory store set-up, We would pick Hextom’s Translate My Store App. For a subdomain set-up, we would pick Weglot’s translation app.
Option 1: Hextom Translate My Store App (Subdirectory/subfolder)
Purchase a translation app: Hextom app + add languages to current domain e.g. website.com/de for Germany
- Free if using manual translations
- $9.99 per month for 20,000 AI translated words
- $49.99 per month 200,000 AI translated words
- Free manual translation within the app
I’d recommend getting a quote from a translator and weigh up the costs
On a tight budget?
Get the $9.99 per month plan for 20,000 AI translated words (Theme, collections, payment pages, emails, etc.) and use import/export feature and Google sheets + Google Translate for the remaining translations. You could also manually copy and paste using the AI translation preview.
Hextom example site international SEO test
This scores reasonably well for International SEO in SEMrush.

The demo site has minor issues as you would expect but nothing critical. Importantly, the canonical + hreflang markup works well without any conflicts in the page code which is reassuring.
The final result on an actual website
In this example, the Shopify store’s international SEO score is pretty high.

The issues it flagged were to do with pages that had parameters e.g. ?page=2 which aren’t really issues. We would use this report as a guide but it’s very useful to visually assess how the implementation went.
Option 2: Weglot Translate Your Store App (Subdomain)
Purchase a translation app: Weglot app + add languages to subdomain e.g. de.website.com for Germany
- Pricing looks more affordable when compared to Hextom
- 190 Euros per year: 3 languages and 50,000 words – looks to be the best deal
- AI translation available and relatively good enough to launch a new territory quickly
- You will need to configure your subdomains within your DNS records using your domain hosting provider
There’s a full guide on how to connect Weglot to your subdomains on their support page.
Hreflang implemented correctly only with the subdomain method
This was the only issue we had with this translation app. We wanted to leverage the strength of a single domain and the hreflang just wasn’t implemented correctly for a subdirectory implementation.
A subdomain method is still a viable option for your new language. Google will understand that the German version of the site is a duplicate of the main domain with correctly applied hreflang tags. But (and this is a big BUT), it’s not guaranteed that all the SEO authority will pass to the subdomain as Search Engines could interpret the subdomain as a completely separate, new site which means you are starting from scratch in a new territory SEO-wise.
https://twitter.com/Kevin_K90/status/1252868808445845506
So why not a subdirectory/subfolder using Weglot?
We tested this implementation and the hreflang failed on a real-life site.

The canonical tags on the /a/l/de pages pointed to a different language URL and did not self-reference.
Hreflang & Canonical Tag Conflicts
SEMRush’s advice when using canonical tags along with hreflang attributes is you should make sure to specify a self-referential canonical tag. Furthermore, Yoast also says, “Don’t make the mistake of setting the canonical on the en-gb page to http://example.com/, as this breaks the implementation.”
Unfortunately, using the subdirectory method with Weglot resulted in too many critical errors.
Option 3: Shopify Multiple Stores
Purchase additional Country Code Top Level Domains (ccTLDs) to launch sites in new territories e.g. website.de, website.fr, website.it etc.
Shopify’s recommended option
This is actually Shopify’s recommended option. However, it requires the most work. It also means more revenue for Shopify so consider it carefully if it’s really what your business needs at the moment. Recurring fees can get quite expensive once you launch a few stores and also consider the marketing effort and cost required to make a return on your investment.
Shopify fees
The additional store on website.de would come with additional fees + additional costs for domain registration, app fees, development, and marketing costs for the new website.
Benefits of Shopify multiple stores
- This option only makes sense if you have a larger marketing budget, development resources, manual translator available, and you are aiming to have a more custom approach to the new country/language
- The biggest benefit is that this is the strongest indicator to Search Engines that your site has specifically geotargeted a location and language
- You can easily import your current Shopify theme into the new store
- You could link products through an app to manage the inventory
- Your payment gateway will be in the store language for each Shopify country’s store
Disadvantages of Shopify multiple stores
- It comes at a much greater cost and considerably more effort
- This effectively duplicates the current site so you’ll have more to manage on an on-going basis
- You’ll need to export your products and then import the information into the new store including product details, prices, images, etc
- Implement hreflang tags either manually or through an app
Translation costs
This option makes real sense if you already have the translations in place and you’d like to provide a completely localised experience for your customers.
If you have already secured translations in the native language, once the store is duplicated, translated page information, product details, meta titles, descriptions, etc can be manually copied across or you can use a translation app.
Consider subscriptions to other Shopify apps
You will have to have two accounts in essence with the duplicated store so extra charges may apply if needed on the second site e.g. reviews app integration would mean a new account being set-up for the additional website.
More links to help you with this process
How to use Google Sheets + Google Translate + Translate My Store for Shopify
Before you continue, I’d only use this option if you want a very quick and basic implementation. Moreover, the quality of the translations would be negatively affected.
The AI translation is better than standard Google Translate as it uses Google’s machine learning cloud translation.
1. Select Import Translation option form the Dashboard
![]()
2. Select the Export Option
![]()
3. Select the Language and Content-Type then preview Load and Preview all Not Translated Items. This will now provide the full list of items into an Excel Spreadsheet
![]()
4. Download the Export file once Status changes to Finished from your Translation Tasks
![]()
5. Import the Spreadsheet into Google Sheets
![]()
Select File > Import > Import File > Upload
6. Enter the GOOGLETRANSLATE formula into the cell where you want the translations
Enter =GOOGLETRANSLATE(F2,"en","de") into the Cell G2, under “Translated Text” and then copy the formula down
Double-check the translations as Google Sheets is limited to 50000 characters in a single cell.
You would have to do certain translations using the Preview AI Translation feature within the Shopify Translate My Store app. We would also be careful of any body-text content types which are filled with scripts, HTML, and/or CSS codes.
Preview these translations instead using the Auto AI Translation feature and then manually import these. Alternatively, you can manually translate taking the code into consideration.
7. Download the now translated content into an Excel sheet
![]()
8. Import the file into Shopify Translate My Store
Upload Spreadsheet File > Choose File > Upload > Start Import Translation
![]()
9. Check your Translation Task in a few minutes and it should have finished
![]()
10. Follow these steps for all the content types until complete
![]()
Step 3: Submit Your New Language to Google for Indexing
After you have successfully implemented your translated Shopify store and checked that it complies with international SEO, you’re ready to submit it to Google via Search Console for indexing.
Create an additional property in Google Search Console
If you used the subdirectory method, choose the URL prefix option and enter the full language subdirectory URL
e.g. https://website-example.com/de

Change Geo-Targeting Settings for the new subdirectory
- Go to Legacy Tools and reports > International Targeting
- Change your Country to Target users in Germany, as an example for website-example.com/de
- Make sure you have only selected the subdirectory property for this change e.g. https://website-example.com/de
If you make the mistake of changing your targeting for the wrong subdirectory or the entire domain property, ensure you reverse the changes. For instance, you wouldn’t want the entire .com domain targeting a single country as this would limit your website’s search appearance internationally.
Create XML Sitemap in Screaming Frog
The easiest way to submit your newly translated store to Google is by using an XML sitemap. However, in Shopify, there isn’t an option to create this within the platform. I’d recommend using a web crawler such as Screaming Frog for the XML sitemap creation.
- Crawl the site folder e.g. https://website.com/de
- Limit the crawl to just the folder
- Untick all items in the Basic Configuration except “Crawl Canonicals” and “Extract hreflang”

- In Limits, tick the box for Limit Number of Query Strings and enter 0

- Then click Sitemaps > XML Sitemaps > Include Hreflang in the Hreflang section
- Click Next and save your XML sitemap

Upload XML Sitemap to Shopify
There’s a more detailed guide on how to create an XML sitemap in Shopify here.
- In your store, go to Settings > Files
- Upload your XML Sitemap
- Copy the URL created which now sits on the CDN
- Now create a redirect in Online Store > Navigation > URL Redirects
- Redirect from a URL that you’ll make up for the new sitemap e.g. /de/sitemap.xml
- Redirect to the URL for the uploaded sitemap e.g. https://cdn.shopify.com/s/files…

Submit New XML Sitemap into Google Search Console
- In Search Console, go to Sitemaps
- Enter the URL for the sitemap you uploaded to Shopify
- Click Submit

You’ll start to get updates from Search Console within a couple of days notifying you that search data will start to be collected. You can then see some data being populated in your reports.

Other Considerations & Next Steps
Congratulations, you’ve now implemented an international Shopify store using some SEO best practice. However, this guide is just the initial set-up.
Here are some other considerations:
Localise the translations
Partner up with a native speaker of the language who understands the customs of the country that you’re expanding into. They can help you with ensuring your translation makes sense. As good as the AI translations are, a native speaker would be able to tell the difference between human vs machine. They can help improve the translation with you and improve your chances of conversion.
The payment gateway will still be in the default language even after translation
The translation app can only translate the theme, pages, products, collections, emails, etc. within your Shopify store. However, anything within the payment gateway will remain in English if your store is primarily for the UK. This is where a multiple Shopify store set-up would be more appealing. Each store would then be set-up with its own separate language.
URLs are not translated
Most translation apps do not translate the URLs. In terms of best practice, it would be better for the user and search engines if the URL was in the native language as well. We haven’t found an app that does this successfully AND also implements the hreflang properly. Again, another case for using a multiple store approach if looking for a more bespoke solution.
Hopefully, you found this guide useful. If you have any questions, feel free to add me on LinkedIn or follow me on Twitter.
As well as being our SEO and content marketing specialist, Kevin is an experienced digital marketing strategist. Having clocked up years working for a vast range of brands, from international credit giant Experian to specialised startups, Kevin’s all-round experience allows him to take a comprehensive view of your online presence to spot gaps, seize opportunities and drive performance. He’s an accomplished speaker and mentor too, delivering talks at industry events.

Kevin Kapezi